13.エクリプスでStruts(ストラッツ)入門
当コーナーはJavaの基本的な事項を紹介していくものです。
Struts(ストラッツ)とは
Strutsとは分かり易く言うとWebアプリケーショ ンを簡単に作成するためのソフトウェアです。Strutsを導入すると基本的な機能があらかじめ実装されているため、開発期間を短縮することが出来ます。
Strutsの特徴
Strutsの特徴として以下の点があります。
- 無 償(無料)である。
- オープンソースである。
- Webアプリケーションの開発期間が短縮できる。
- フレームワークとしてメジャーである。
Strutsのダウンロードとインストール
Strutsのダウンロード
SStrutsを使うにあたり、Apache Software Foundationからソフトウェアである、Strutsを入手する必要があります。最新のソフトウェアは http://struts.apache.org/download.cgiか らダウンロード出来ます。
今回はver.1.3.1を利用してみます。struts.apache.org/download.cgiという画面に遷移しますので、そこからstruts-1.3.10-apps.zipをダウンロードしましょう。
Strutsのインストール
struts-1.3.10-apps.zipを 展開するとstruts-1.3.10というフォルダが出来ます。その中のwebappsフォ ルダの下にstruts-examples-1.3.10.warというwarファ イルがあります。そのファイルだけをTomcatをインストールしたフォルダの中のwebappsフォ ルダにコピーします。Tomcatを起動して、http://localhost:8080/struts-examples-1.3.10/に アクセスします。次のような画面が出たらインストールは終了です。
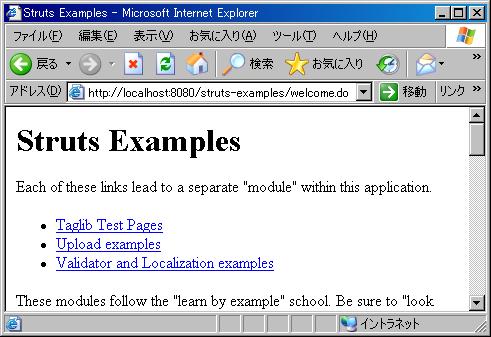
Struts動作
Sampleのインストール
先ほど展開して出来たstruts-1.3.10というフォルダの中のwebappsフォ ルダの下にstruts-blank-1.3.10.warというファイルが入っています。このファイル は、Strutsを使用する時に必要なファイルが含まれた、warファイルです。このファイ ルを使って、簡単なWebアプリケーションを作成します。
まず、eclipseで新規にTomcatプロジェクトを作ります。ここではstruts-testという名前で作ります。次に、warファイルを解凍し ます。(解凍出来ない方は拡張子warをzipにして解凍してください。)
解凍して出来たフォルダstruts-blank-1.3.10の中のpagesフォルダ、WEB-INFフォルダとindex.jspを先ほど作ったプロジェクトに上書きします。
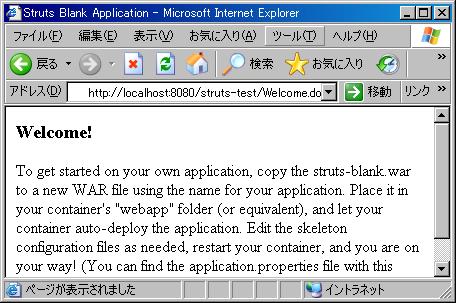
そして、Tomcatを起動した後にブラウザで http://localhost:8080/struts-testと入力してください。下記の画面が 出てきたら成功です。
簡単な足し算プログラムの作成
それでは準備が整いましたので、これから足し算をするwebアプリケーションを作成します。
最初に、struts-test/WEB-INF/libの中にあるファイル全ての パスを通します。 プロジェクトを右クリック>「ビルド・パス」→「ビルド・パスの構成」を選択します。 「ライブラリ」タブから「JARの追加」ボタンをクリックします。 struts-test/WEB-INF/libの中にあるファイル全てを選択し、「OK」ボタンをクリックします。
これでパスが通りました。
次に、足し算の値を入力するjsp(addition.jsp)と結果を表示するjsp(result.jsp)を作ります。
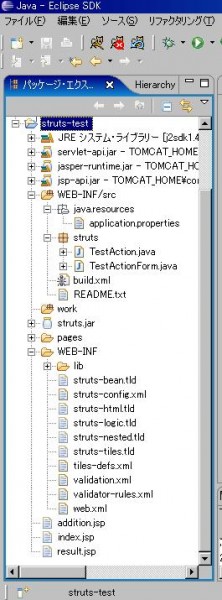
作成したファイルはプロジェクトの直下に入れます。
addition.jsp
<%@ page contentType="text/html; charset=Windows-31J" %>
<!--使うstrutsタグを指定-->
<%@ taglib uri="http://struts.apache.org/tags-html" prefix="html" %>
<%@ taglib uri="http://struts.apache.org/tags-bean" prefix="bean" %>

<html:html>
  <head>
    <title>アイオステクノロジーの足し算JSP</title>
    <meta http-equiv="Content-Type"
                  content="text/html; charset=Windows-31J">
  </head>
<body>

<!--実際に処理を実行するactionクラスを指定する-->
<html:form action="/TestAction">
  <!--プロパティファイルに書かれたメッセージを表示する-->
  <bean:message key="msg.title"/><br><br>
  <!--左側の入力の枠-->
  <html:text property="leftNum" size="10" maxlength="7" /> +
  <!--右側の入力の枠-->
  <html:text property="rightNum" size="10" maxlength="7" />
  <!--実行ボタンこのボタンを押すとデータが飛んで処理が行われる-->
  <html:submit property="submit" value="実行"/>
</html:form>
</body>
</html:html>
result.jsp
<%@ page contentType="text/html; charset=Shift_JIS" %>
<%@ taglib uri="http://struts.apache.org/tags-html" prefix="html" %>
<%@ taglib uri="http://struts.apache.org/tags-bean" prefix="bean" %>

<html:html>
  <head>
    <title>アイオステクノロジーの計算結果JSP</title>
    <meta http-equiv="Content-Type"
            content="text/html; charset=Windows-31J">
  </head>
<body>

<bean:message key="msg.answer"/>
<bean:write name="Action" property="resultNum" scope="request" />
<!--nameはstruts-configのbeanで指定したActionFormの名前です-->
<!--propertyはActionFormの計算結果を格納した変数名です-->
<!--scopeはデータを送る形式です-->
<bean:message key="msg.desu"/><br><br>
<html:link href="addition.jsp" >戻る</html:link>
</body>
</html:html>
次に、入力された値を保持するActionFormクラスと実際の足し算をするActionクラスを作ります。作成したファイルはWEB-INF/src にstrutsというパッケージを作ってその中に入れます。
TestActionForm.java
package struts;
import org.apache.struts.action.ActionForm;

public final class TestActionForm extends ActionForm {

    private static final long serialVersionUID = 1L;

    /** 左の数値 */
    private int leftNum;

    /** 右の数値 */
    private int rightNum;

    /** 計算結果 */
    private int resultNum;

    /**
     * @return 左の数値を返します
     */
    public int getLeftNum() {
        return leftNum;
    }

    /**
     * @param 左の数値を設定します
     */
    public void setLeftNum(int leftNum) {
        this.leftNum = leftNum;
    }

    /**
     * @return 右の数値を返します
     */
    public int getRightNum() {
        return rightNum;
    }

    /**
     * @param 右の数値を設定します
     */
    public void setRightNum(int rightNum) {
        this.rightNum = rightNum;
    }

    /**
     * @return 計算結果を返します
     */
    public int getResultNum() {
        return resultNum;
    }

    /**
     * @param 計算結果を設定します
     */
    public void setResultNum(int resultNum) {
        this.resultNum = resultNum;
    }
}
TestAction.java
package struts;
import javax.servlet.http.HttpServletRequest;
import javax.servlet.http.HttpServletResponse;
import org.apache.struts.action.Action;
import org.apache.struts.action.ActionForm;
import org.apache.struts.action.ActionForward;
import org.apache.struts.action.ActionMapping;

public final class TestAction extends Action {
  public ActionForward execute(ActionMapping mapping,
                               ActionForm form,
                               HttpServletRequest req,
                               HttpServletResponse res) {

    //TestActionFormにキャストします
    TestActionForm taf = (TestActionForm)form;

    //TestActionFormから値を取り出します
    int leftNum  = taf.getLeftNum();
    int rightNum = taf.getRightNum();
    int resultNum = 0;

    //足し算して結果をresultNumに入れます
    resultNum = leftNum + rightNum;

    //計算結果をTestActionFormに入れます
    taf.setResultNum(resultNum);

    //アクション・クラス実行後の遷移先を指定します。
    //(struts-configで指定した略称)
    return (mapping.findForward("result.jsp"));
  }
}
次に、メッセージを置くプロパティファイルを作成します。このファイルはデフォルトで配置されているので、MessageResources.propertiesをコピーし下記の3項目を追記してください。
追記後、作成したファイルを上書きします。
場所はWEB-INF/srcのjavaパッケージの中です。
MessageResources.properties
msg.title=足し算プログラム
msg.answer=答えは
msg.desu=です。
最後に、今まで作ったものを紐付けるstruts-configを作成します。このファイル はデフォルトで配置されているので、そのファイルに作成したファイルを上書きします。場所はWEB-INFの直 下です。
struts-config.xml
<?xml version="1.0" encoding="UTF-8" ?>

<!DOCTYPE struts-config PUBLIC
          "-//Apache Software Foundation//DTD Struts Configuration 1.2//EN"
          "http://jakarta.apache.org/struts/dtds/struts-config_1_2.dtd">
<struts-config>

	<form-beans>
		<!--beanにはデータを格納するActionFormクラスを設定します-->
		<!--nameは略称、typeはpathを含むファイル名です-->
		<form-bean
			name="Action"
			type="struts.TestActionForm"/>
	</form-beans>

	<global-forwards>
		<forward
			name="welcome"
			path="/Welcome.do"/>
		</global-forwards>

	<action-mappings>
		<!--actionは実際に処理を行うActionクラスを設定します-->
		<!--pathはjspで指定するときの略称です-->
		<!--nameは使用するbean(ActionForm)の略称を入れます-->
		<!--typeはpathを含むファイル名です-->
		<!--scopeはデータ転送形式です-->
		<!--inputは実行されるjspです-->
		<action
			path="/Welcome"
			forward="/pages/Welcome.jsp"/>
		<action
			path="/TestAction"
			type="struts.TestAction"
			name="Action"
			scope="request"
			input="/addition.jsp">
			<forward name="result.jsp" path="/result.jsp"/>
		</action>
	</action-mappings>
	<message-resources parameter="java.MessageResources"/>
</struts-config>
ファイルの配置は以下のようになります。
実行する
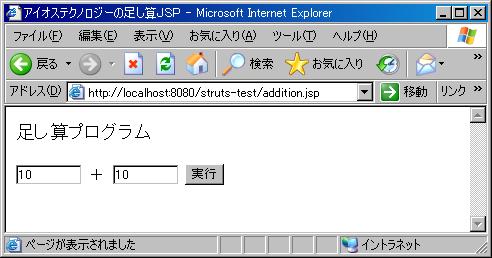
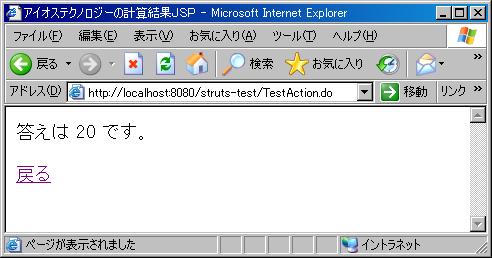
http://localhost:8080/struts-test/addition.jspにアクセスして,数値を入れて実行ボタンを押すと画面が 切り替わり結果を表示します。
足し算する値を入力。
結果を表示。
入力チェックを行う
ここまでで足し算プログラムは完成していますが、入力フォームが空欄のままであったり、入力フォームに数字以外の文字をいれたりしても計算処理を行ってしまいます。
そこでStrutsに用意されているValidatorを利用すると、入力項目の値が適切かどうかチェックを行うことができます。
Validatorを利用するにはValidatorFormをActionFromのスーパークラスにする必要があります。
TestValidatorForm.java
package struts;
import org.apache.struts.action.ActionForm;

public final class TestActionForm extends ActionForm {

    private static final long serialVersionUID = 1L;

    /** 左の数値 */
    private int leftNum;

    /** 右の数値 */
    private int rightNum;

    /** 計算結果 */
    private int resultNum;

    /**
     * @return 左の数値を返します
     */
    public int getLeftNum() {
        return leftNum;
    }

    /**
     * @param 左の数値を設定します
     */
    public void setLeftNum(int leftNum) {
        this.leftNum = leftNum;
    }

    /**
     * @return 右の数値を返します
     */
    public int getRightNum() {
        return rightNum;
    }

    /**
     * @param 右の数値を設定します
     */
    public void setRightNum(int rightNum) {
        this.rightNum = rightNum;
    }

    /**
     * @return 計算結果を返します
     */
    public int getResultNum() {
        return resultNum;
    }

    /**
     * @param 計算結果を設定します
     */
    public void setResultNum(int resultNum) {
        this.resultNum = resultNum;
    }
}
TestValidatorAction.java
package struts;
import javax.servlet.http.HttpServletRequest;
import javax.servlet.http.HttpServletResponse;
import org.apache.struts.action.Action;
import org.apache.struts.action.ActionForm;
import org.apache.struts.action.ActionForward;
import org.apache.struts.action.ActionMapping;

public final class TestAction extends Action {
  public ActionForward execute(ActionMapping mapping,
                               ActionForm form,
                               HttpServletRequest req,
                               HttpServletResponse res) {

    //TestActionFormにキャストします
    TestActionForm taf = (TestActionForm)form;

    //TestActionFormから値を取り出します
    int leftNum  = taf.getLeftNum();
    int rightNum = taf.getRightNum();
    int resultNum = 0;

    //足し算して結果をresultNumに入れます
    resultNum = leftNum + rightNum;

    //計算結果をTestActionFormに入れます
    taf.setResultNum(resultNum);

    //アクション・クラス実行後の遷移先を指定します。
    //(struts-configで指定した略称)
    return (mapping.findForward("result.jsp"));
  }
}
次にvalidation.xmlの設定を行います。
このファイルはデフォルトで配置されているので、そのファイルに作成したファイルを上書きします。場所はWEB-INF直下です。
validation.xml
<?xml version="1.0" encoding="UTF-8" ?>
<!DOCTYPE form-validation PUBLIC
     "-//Apache Software Foundation//DTD Commons Validator Rules Configuration 1.3.0//EN"
     "http://jakarta.apache.org/commons/dtds/validator_1_3_0.dtd">

<form-validation>

    <global>

        <!-- An example global constant
        <constant>
            <constant-name>postalCode</constant-name>
            <constant-value>^\d{5}\d*$</constant-value>
        </constant>
        end example-->

    </global>

    <formset>

        <form name="Action">
            <field
                property="leftNum"
                depends="required,mask">
                    <arg name="required" key="errors.figureRequired"/>
                    <arg name="mask" key="errors.notFigure"/>
                    <var>
                        <var-name>mask</var-name>
                        <var-value>^[0-9]*$</var-value>
                    </var>
            </field>
            <field
                property="rightNum"
                depends="required,mask">
                    <arg name="required" key="errors.figureRequired"/>
                    <arg name="mask" key="errors.notFigure"/>
                    <var>
                        <var-name>mask</var-name>
                        <var-value>^[0-9]*$</var-value>
                    </var>
            </field>
        </form>

    </formset>
</form-validation>
合わせてstruts-config.xmlの設定も変更します。
struts-config.xml
<?xml version="1.0" encoding="UTF-8" ?>
<?xml version="1.0" encoding="UTF-8" ?>

<!DOCTYPE struts-config PUBLIC
          "-//Apache Software Foundation//DTD Struts Configuration 1.3//EN"
          "http://jakarta.apache.org/struts/dtds/struts-config_1_3.dtd">
<struts-config>

	<form-beans>
		<!--beanにはデータを格納するActionFormクラスを設定します-->
		<!--nameは略称、typeはpathを含むファイル名です-->
		<form-bean
			name="Action"
			type="struts.TestValidatorForm"/>
	</form-beans>

	<action-mappings>
		<!--nameは使用するbean(ValidatorForm)の略称を入れます-->
		<!--validateは検証を行う場合はtrueにします-->
		<!--inputは検証の結果エラーが出た場合の遷移先です-->
		<action
			path="/Welcome"
			forward="/pages/Welcome.jsp"/>
		<action
			path="/TestAction"
			type="struts.TestValidatorAction"
			name="Action"
			scope="request"
			validate="true"
			input="/addition.jsp">
			<forward name="result.jsp" path="/result.jsp"/>
		</action>
	</action-mappings>
	<message-resources parameter="java.MessageResources"/>
		<!--validatorプラグインの設定を記述します-->
<plug-in className="org.apache.struts.validator.ValidatorPlugIn">
    <set-property property="pathnames"
        value="/org/apache/struts/validator/validator-rules.xml,
               /WEB-INF/validation.xml"/>
</plug-in>
</struts-config>
MessageResources.properties
エラー時に表示されるメッセージをMessageResources.propertiesに追加します。(もとの情報は消さないで下さい。)
errors.required={0} is required.を書き換えてください。
msg.title=足し算プログラム
msg.answer=答えは
msg.desu=です。
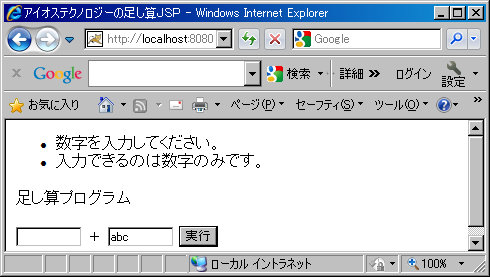
errors.figureRequired=数字を入力してください。
errors.notFigure=入力できるのは数字のみです。
最後に、addition.jspにエラーメッセージの表示処理を実装します。
addition.jsp
<%@ page contentType="text/html; charset=Windows-31J" %>
<!--使うstrutsタグを指定-->
<%@ taglib uri="http://struts.apache.org/tags-html" prefix="html" %>
<%@ taglib uri="http://struts.apache.org/tags-bean" prefix="bean" %>

<html:html>
  <head>
    <title>アイオステクノロジーの足し算JSP</title>
    <meta http-equiv="Content-Type"
                  content="text/html; charset=Windows-31J">
  </head>
<body>

<!--エラーメッセージの表示処理を記述します-->
<html:errors/>
<html:form action="/TestAction">
  <bean:message key="msg.title"/><br><br>
  <html:text property="leftNum" size="10" maxlength="7" /> +
  <html:text property="rightNum" size="10" maxlength="7" />
  <html:submit property="submit" value="実行"/>
</html:form>
</body>
</html:html>
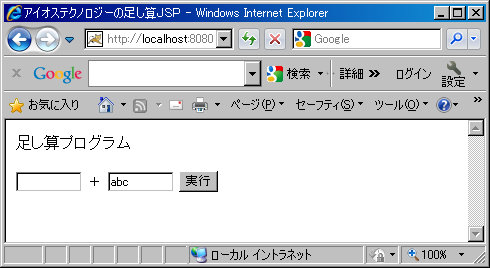
http://localhost:8080/struts-test/addition.jspにアクセスして、入力欄が空欄または数値以外の文字を入れて実行ボタンを押すとエラーメッセージが表示されます。
数字以外の文字を入力。
エラーメッセージを表示。
これで簡単な足し算プログラム作成を終わります。
Java入門セミナーではStrutsを利用して本格的なアプリケーション作成もおこなっています。 未経験者も、もちろん独学からエンジニアを目指す方の役に立つ知識を吸収できます。
